From Prep to Perfection: A Professional Installer’s Guide to Epoxy Floors

Epoxy flooring has grown into one of the most requested finishes in both commercial and residential settings. Known for its high durability, chemical resistance, and sleek aesthetic, epoxy is ideal for garages, basements, warehouses, showrooms, and even designer interiors.
However, epoxy is unforgiving to installer mistakes — surface prep, mixing, and application must be executed with precision. This article will walk you through every critical step of epoxy floor installation.
Why Epoxy Flooring?
-
Seamless surface – Easy to clean, resistant to oil, water, and chemicals
-
High durability – Handles heavy traffic and equipment
-
Customizable – Can include colors, flakes, quartz, metallic pigments
-
Moisture blocking – Helps seal out vapor when applied properly
“Epoxy is like paint with the strength of concrete — but only if it’s installed correctly from the ground up,” says Carl R., industrial coatings specialist.
Required Tools & Materials
-
Diamond grinder or shot blaster
-
HEPA vacuum
-
Moisture meter (RH or calcium chloride test)
-
Mixing drill with paddle
-
Squeegee and back-rolling roller
-
Epoxy resin and hardener
-
Optional: primer coat, flakes, topcoat (polyaspartic or polyurethane)
-
Spiked shoes (for walking on wet epoxy)
Step-by-Step Epoxy Flooring Installation Guide
1. Moisture & Substrate Testing
Use a calcium chloride test or in-slab RH test to measure moisture content. Epoxy fails when applied over damp concrete. Ensure levels are below 3 lbs/1,000 sq ft or <75% RH unless using vapor-blocking primer.
2. Surface Prep: Grind, Clean, Repeat
Use a concrete grinder or shot blaster to open the slab’s pores and remove any coatings. Vacuum dust thoroughly with a HEPA-filtered vac. Clean with denatured alcohol if needed.
“90% of epoxy failures come from poor prep. The surface must be clean enough to eat off,” says epoxy foreman Miguel T.
3. Priming the Surface (Optional but Recommended)
Primers promote stronger bonding and reduce bubbling. Use a compatible epoxy or moisture vapor barrier primer and apply thinly with a squeegee and roller.
4. Mixing the Epoxy
Mix parts A and B precisely according to manufacturer specs. Use a low-speed drill and mix for 2–3 minutes. Never mix partial batches unless exact measurements are taken.
-
Tip: Once mixed, you have 20–40 minutes of working time — plan accordingly.
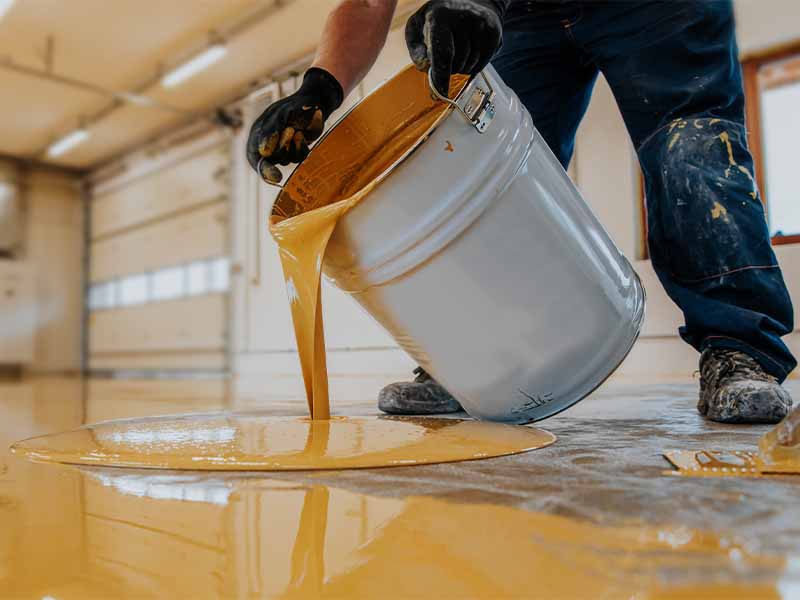
5. Apply the Base Coat
Pour epoxy in a line across the floor. Use a squeegee to spread it evenly, then back-roll with a 3/8” nap roller in a “W” pattern. Work in 10×10 foot sections and blend as you go.
6. Add Decorative Flakes or Pigments
Broadcast flakes or metallic pigment into wet epoxy. Work fast and evenly. Excess can be removed once cured.
7. Apply Topcoat (Optional but Critical)
For added chemical resistance and gloss, use a polyaspartic or urethane topcoat. This also helps lock in flakes and protect the color layer.
8. Curing Time
Allow to cure per product instructions (usually 24 hours light foot traffic, 72+ for heavy use). Maintain temps above 60°F during curing.
Advanced Pro Tips
-
Always wear spiked shoes during wet application
-
Control humidity and temperature during install
-
Use masking tape to cut-in around edges or expansion joints
-
Pour mixed epoxy immediately out of the bucket — don’t let it sit or it’ll overheat
-
If bubbles appear, use a de-gassing roller during wet stage
Common Pitfalls to Avoid
| Mistake | Result |
|---|---|
| Skipping moisture test | Peeling and delamination |
| Inadequate surface prep | Weak bond and early wear |
| Overmixing or mixing too fast | Air bubbles, reduced pot life |
| Applying too thickly | Yellowing, improper cure |
| Skipping topcoat | Surface scratches, UV fading |